


TRE
BMW 3 Series G20 G21 LCI Carbon Fibre Performance Rear Diffuser Set by TRE (2023+)
BMW 3 Series G20 G21 LCI Carbon Fibre Performance Rear Diffuser Set by TRE (2023+)
 Shipped Worldwide
 Fitted With Precision
 Ready To Ship


Couldn't load pickup availability
Please contact us for a quote on shipping if your area is not available for checkout.


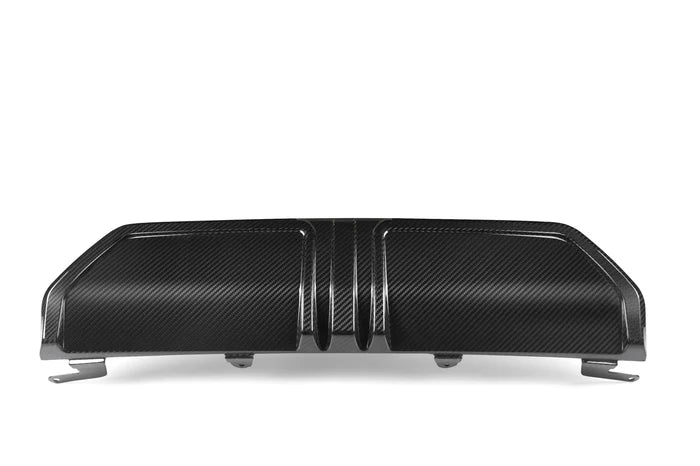
The TRE Performance Rear Diffuser for the BMW 3 Series M Sport LCI has been made to provide an aggressive centre piece on the rear of the vehicle.
It is constructed from 3 pieces of pre-preg Carbon Fibre.
NOTE: This kit is for European cars only.
What's in the box
- 3 x TRE Carbon Fibre (pre-preg, 2x2 Weave) Rear Diffuser Pieces
Compatible models
- BMW 3 Series LCI (2023+, G20 G21)
NOTE: This kit is for European cars only.
How to install
BMW G20 M Sport — TRE 3-Piece Rear Diffuser Installation Guide
Difficulty: ★★☆☆☆ (Moderate)
Time Required: 30–45 minutes
Tools Needed:
-
Plastic trim removal tools
-
T20 Torx screwdriver
-
8mm socket wrench
-
Microfiber towel or fender cover
-
Optional: a friend or second person for alignment assistance
-
Park the vehicle on a flat surface and engage the parking brake.
-
If possible, raise the rear of the car slightly using ramps or a lift for easier access.
-
Use a microfiber towel or fender cover to protect the paint around the rear bumper.
-
Ensure the diffuser and surrounding area are clean and free of dirt or debris—this prevents scratches during removal and installation.
-
Begin by removing the screws along the underside of the OEM diffuser using an 8mm socket or T20 Torx driver, depending on your model.
-
Once the screws are out, use a plastic trim removal tool to gently pry the diffuser away from the bumper.
-
Work your way from one side to the other, carefully releasing the diffuser clips. Avoid using metal tools, as they can damage the bumper tabs.
-
Once all clips are disengaged, pull the OEM diffuser straight out and set it aside.
-
Before full installation, test-fit all three TRE diffuser pieces (left, right, and center) to familiarize yourself with alignment and fitment.
-
Check that all clip points and screw holes line up correctly with the factory mounting locations.
-
If necessary, make small adjustments to ensure a flush, even fit before securing anything permanently.
-
Begin with the left-side diffuser piece. Align the mounting tabs with the OEM clip points, then press firmly until all clips snap securely into place.
-
Repeat the process on the right-side diffuser piece, confirming that both ends are evenly seated and flush with the bumper contours.
-
Reinstall any factory screws along the lower edge of each side piece if applicable.
-
Align the center diffuser section between the two installed side pieces. Ensure that the edges overlap cleanly and that all clip points are fully engaged.
-
Press upward and inward firmly until the center piece locks into place with an audible “click.”
-
Reinstall the remaining screws along the underside of the diffuser to secure all three sections.
-
Perform a final visual check—ensure all edges are even, clips are seated, and the diffuser sits flush with the bumper.
-
Recheck all clip points and screws after a short drive to ensure nothing has shifted.
-
For an OEM-like fitment, patience and even pressure during installation are key—avoid forcing any section into place.
-
If you plan to apply ceramic coating or PPF to the diffuser, do so before installation for the best finish.
TRE
 TRE ("T-R-E") products represent the pinnacle of range. Each product is built to the very highest standards and are covered by an industry leading two year warranty. The sole aim of each part in this range is to push boundaries and bring you closer to The Racers Edge.
The pre-preg (dry) manufacturing method used in TRE carbon fibre parts is lighter, stronger and more premium than those found in it's range.